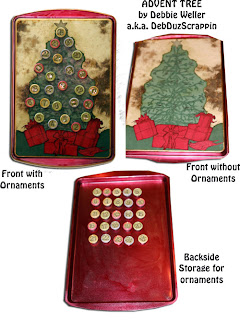
"Advent Tree"
Altered Cookie Sheet
Supplies:
1 metal baking pan
Alcohol Inks: Ranger Industries
Inks: Ranger Industries
Plastic Disks: Rollabind
Glossy Accents: Ranger Industries
Small circle magnets:
Glue Dots
Rubberstamps: Club Scrap
Pattern paper: Club Scrap
Modge Podge
Polycrylic Gloss Overcoat
Instructions:
1. Using felt applicator, and a q-tip as needed, apply cranberry alcohol ink to the edges and inside of the metal baking pan. Let dry.
2. Cut background pattern paper to fix the backside of the metal pan, round corners. Ink edges.
3. Apply a coat of modge podge to the backside of the metal pan, put down the pattern paper, apply another coat of modge podge. Let dry.
4. Take pattern paper with the tree image, and carefully tear out the tree. Ink edges of the torn image.
5. Apply a coat of modge podge to the backside of the tree image and lay image down onto the background paper, apply another coat of modge podge over tree image.
6. Take pattern paper with ‘presents’ images, cut out presents, ink edges.
7. Stamp an image of the “sled” on the red cardstock and the “star” on cream cardstock, trim out image, ink edges.
8. Apply a coat of modge podge to the backside of the “presents” and “sled” images and lay images down onto the background paper at the base of the tree, place the “star” at the top of the tree, apply another coat of modge podge over these images. Let dry.
9. Once completely dry, spray entire backside of pan with a clear polycrylic protective spray. Do 2-3 coats, allowing appropriate dry time in between coats per instructions on canister.
10. To create the “ornaments,” get 25 white rollabind disks. Using alcohol inks, color the oraments with eggplant, caramel, cranberry, and pesto. Let dry.
11. Punch small cream colored circles that fit inside the rollabind disks.
12. Stamp numbers 1 through 25 onto the circles.
13. Put a drop of glossy accents into the rollobind disc, then place the circle punch in, press into the glossy accents, finish by covering the circle with a coat of the glossy accents. Let dry.
14. On the backside of each rollabind disc, use 3D glue dots to attach magnet discs.
15. If your pan doesn’t have a hole in the upper handle, you can drill one. Now you can hang on the wall. You can store all the magnets on the inside of the pan and add them one at a time for each day to the front of the pan on the “tree”.
Good luck and have fun!!
Debbie Weller
DebDuzScrappin.com
No comments:
Post a Comment